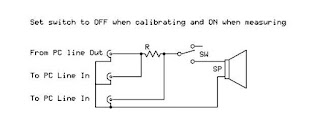
Here's a redux of a very useful simple circuit that, when used with the ARTA LIMP software running on a PC, allows you to easily measure loudspeaker impedance curves, RLC values of passive components at various frequencies, and TS parameters of loudspeaker drivers. You should be able to do all this with the FREE demo version of ARTA.
It has saved me from the curse of Speaker Workshop, which is an extremely useful tool, but a real PITA to get going.
This jig is useful for low-power measurements. For higher power measurements, you will need some sort of protection devices on the PC Line-In sockets and also a power amplifier to drive the speaker. Regardless, the circuit above works, and works very well for what it does. I've ran it on a variety of drivers with my Audigy2 sound card and also the crappy on-board sound on my computer and the results obtained compare very favorably with the manufacturers specs and graphs.
The way it works is the PC line-out powers the driver under test via a series resistor of known value. The line-in connections act as voltage probes fore and aft of this resistor, allowing the software to determine impedance variation with frequency. There are some fancy jigs out there, but this one works well and costs literally nothing to build . If you're cheap / lazy like me, you can forego the switch and merely disconnect the driver when calibrating the jig (do this everytime you re-connect it). This is probably a better / cheaper idea as the contact resistance of a typical cheap switch can vary between 0.5 - 3 ohm, .. fairly significant when you consider that the typical driver has a nominal impedance of 4 - 8 ohm .
Also, I'd suggest disconnecting the jig when not using it, .. probably not the best idea to leave a loopback into the sound card long term.
You will need
1. 3 RCA sockets
2. One single pole switch, or whatever you have lying around that works. Try to ensure that it doesn't have too high a contact resistance.
3. One calibration resistor, . the exact value is not too important, as long as you know what it is. I used a 14.7 ohm resistor made up of multiple larger equal valued resistors in parallel to reduce the effects of resistor to resistor variation.
4. One pair of binding posts.
5. One plastic enclosure to build this contraption into.
6. Two stereo-RCA to mini plug cables a.k.a "I POD" cables
Note: sound card settings
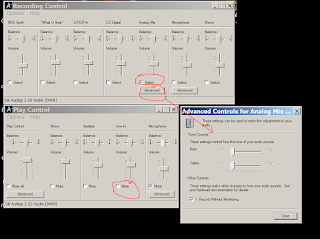
Here's how my sound card is set up, as viewed from Windows Mixer . Your input and output settings may vary, depending on your specific hardware but try to note / check the following:
- The important thing to ensure is that you select the correct Line-In input in the Recording panel.
- Also, you may / may not need to mute the Line in on the Playback panel, as well as the Microphone in.
- My Audigy 2 has a bunch of options and I had to experiment a bit initially trying the various inputs (some looped-back internally bypassing the calibration resistor:(.
- If you have an Audigy type card, be sure to check the "record without monitoring option" . See picture below.
- If you get a channel imbalance of 0.0 dB when calibrating, you probably have an internal loopback.
- Once you get ARTA working, you may consider muting un-needed inputs / outputs .
- Watch out that you aren't too close to sources of electrical interference (such as CPU fans) as you can pick up spurious 120 Hz interference on impedance graphs.

You will want to read the ARTA / LIMP manual for a full description of the procedure but it really isn't too tough. Basically
1. Connect the cables between the PC and the jig, the jig and the driver under test and set the switch to OFF . If you haven't built in a switch, just make sure the driver is disconnected from the jig.
2. Calibrate the jig (configure the value of the calibration resistor, set the correct reference channel, set the appropriate input and output devices on your sound card, and adjust the levels so you don't clip the input). When calibrated, the jig should indicate a SMALL difference in channel levels (say 0.1 dB or so). If you have a large imbalance (greater than 2 - 3 dB), something is not connected correctly. If you have no imbalance, the output is being looped-back to the input within the sound card . Check for the correct input and output settings on your sound card.
3. Set the switch to ON
4. Press the red record button and within seconds, you should have an impedance curve.
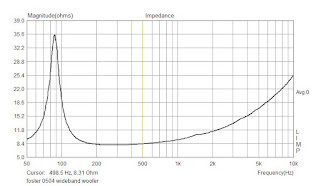
Here's an example (different specimen than the one used for T/S parameters further down this post):

Wasn't that easy?
5. Now, if you want to go further and determine the TS parameters, navigate to the Analyze / Loudspeaker parameters - Added mass method . Enter the DC resistance and the Membrane diameter (the diameter of the driver cone +1/3 of the surround thickness) and calculate the TS parameters. This will calculate most of the important stuff.
6. Now close this window, go back to the graphs and navigate to Overlay / Set as overlay. This establishes a baseline for the Vas calculation.
7. Add mass to the cone. The cheapest and easiest way I've found to this is to secure one or more pennies to the cone with small pieces of weather-stripping (light, easily removable and damp the coins). A U.S. penny's mass is 2.5 grams (on earth, at least). Here are the weights for some other US coins.
8. Now, run an impedance sweep again. You should see the resonant frequency peak shift lower. You want to see a decrease of about 10 or more percent. If not, you haven't added enough mass.
9. Stop the measurement and then navigate back to the Loudspeaker parameters - Added mass method window. Enter the total mass you had to add to the cone and re-calculate. If done correctly, you should see the Vas and a bunch of other parameters show up.
Here's an example of what I get for a cheap foster wideband woofer
Thiele-Small parameters:
Fs = 82.89 Hz
Re = 7.80 ohms[dc]
Le = 1115.28 uH
L2 = 437.31 uH
R2 = 12.76 ohms
Qt = 1.17
Qes = 1.47
Qms = 5.81
Mms = 4.89 grams
Rms = 0.438236 kg/s
Cms = 0.000754 m/N
Vas = 7.86 liters
Sd= 86.18 cm^2
Bl = 3.679200 Tm
ETA = 0.29 %
Lp(2.83V/1m) = 86.89 dB
Added Mass Method:
Added mass = 2.50 grams
Diameter= 10.48 cm
Compare this with the manufacturer's specs, not a perfect match but not bad, considering manufacturing variations, and the fact that I wasn't paying too much attention when testing this.
Foster 2422 264 00504
Paper cone, cloth surround wide band woofer.
8 ohm
87.3dB
Fs 80.7Hz
Vas 10 liters
Qms 4.267
Qes 1.375
Qts 1.040
BL 3.57
Cms 808.7 uM/N
Mms 4.81g
Re 7.2 ohm
Krm 1.155
Kxm 6.832
Erm 0.818
Exm 0.716
Sd 0.0094 sqM
Le 0.57mH @ 1kHz
Enjoy
7 comments:
Thanks for this walk-thru. It's going to be a while before I can afford to buy software (ARTA or otherwise) and I've had the drivers for my speakers for about a year. This gave me the encouragement I needed to give ARTA a try.
I think a trip to RS is in order!
Best of luck. Post back if this simple setup works for you. The sound card settings can sometimes be a bit tweaky but try to persevere.
It's great! I had tried this last night and it's so helpful.. I'm looking forward in using the data for the box design...
Thanks, this is great program, Iam off from the speakerworkshop nightmare...I was using a creative SB live 24bit 7.1 with 48k sampling.
Very informative and worthy post. Thanks for the sharing such a precious updates with us.
Dell - Refurbished - 14" Vostro Notebook - 4 GB Memory - 500 GB Hard Drive - Red
Dell - Refurbished - 14" Latitude - 8 GB Memory - 640 GB Hard Drive
Very informative and worthy post. I was actually looking for this kind of tool for my DIY projects Thanks for the sharing such precious updates with us.
for unique product visit This is cool stuff
For HD wallpaper visit HD Wallpaper Collections
Hi nnice reading your post
Post a Comment